Monday, December 10, 2012

Happy Holidays!


Hello, and Happy Holidays! 

Yep, I am still alive...just been taking a little blogging break.

If I am not back before Christmas, please have a Wonderful Holiday! 

Love, Kami and N8dogg 


Pin It!

Sunday, November 18, 2012

Happy Sappy Saturday...on Sunday!

I was looking through my photos today, and found this.


This is N8dogg and I six years ago on Thanksgiving.

Wow...

Look how young we were. :o)

A lot has happened in the last six years, and I am thankful for it all!

Happy Sappy Saturday...on Sunday, and Happy Thanksgiving! 


Pin It!

Tuesday, November 13, 2012

Gingerbread Men Pillows!

Hello, and Happy Tuesday!

How was your weekend?

I worked, but was still able to get a lot accomplished, which is my favorite kind of weekend. :o)

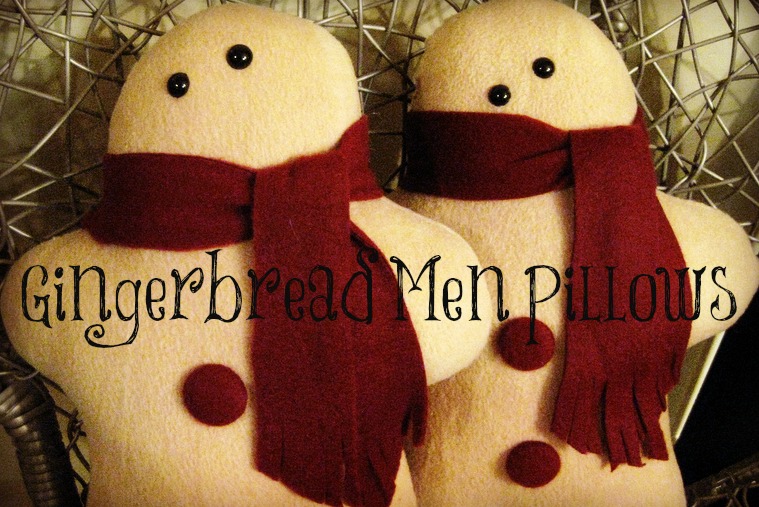
Anyway, last weekend was my Mom's Birthday, and since she has a small Gingerbread Man obsession I decided to make her some of these...


Aren't they cute!

They didn't turn out exactly as I had imagined, but I still LOVE them.

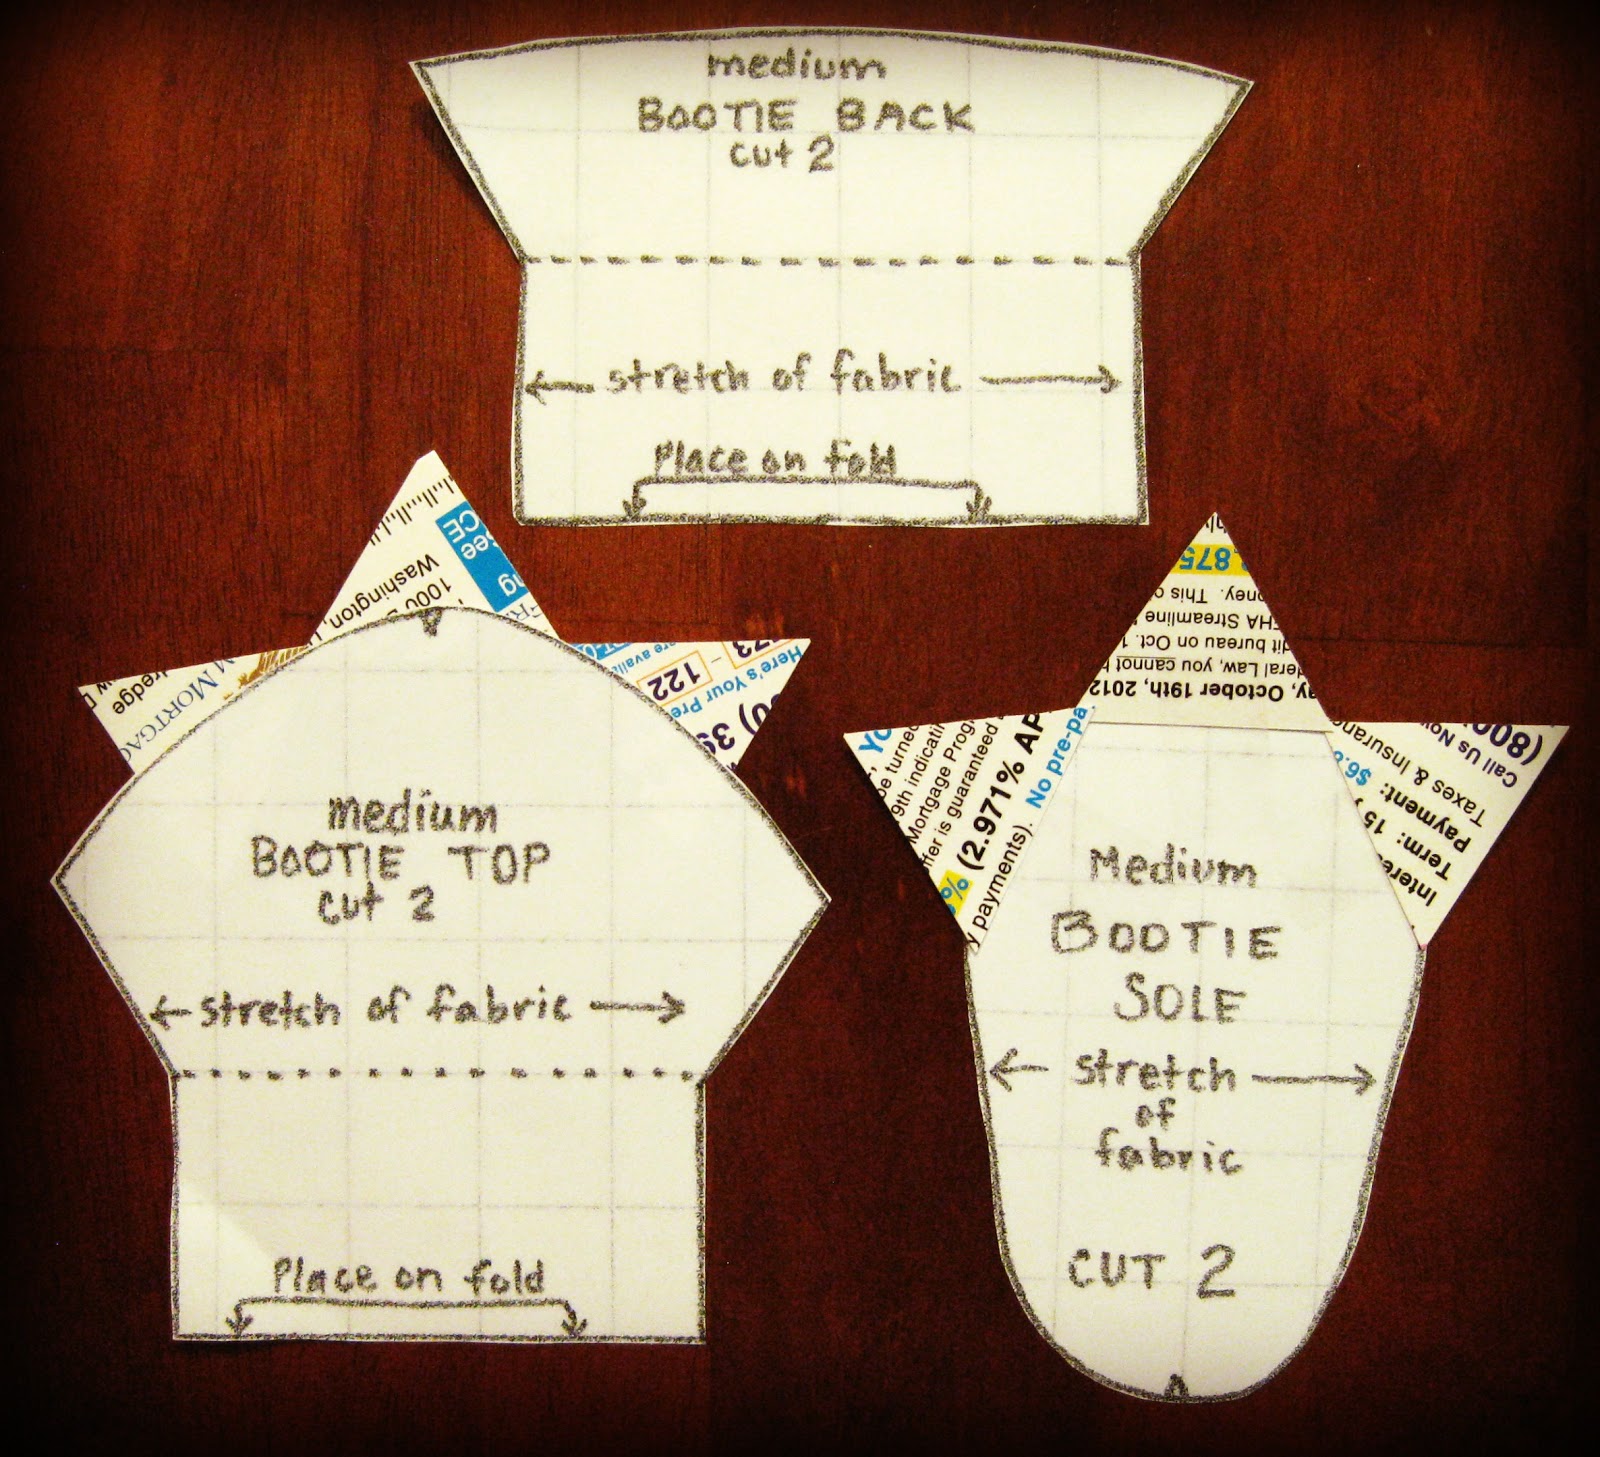
I started by making a gingerbread man pattern in MS Word.


I wish I had a copy for you, but it accidentally got deleted. :(

However, you can easily make your own, or just find one on Google.

Okay, so once I had my pattern I printed it out, enlarged it about 200%, and then just taped it all together.


Once it was all taped up I cut it out, and reinforced my taping job.


Next, I used my template to cut out my gingerbread men.


I used fleece because it is forgiving, but you could use any type of fabric.


Okay, so once I got my gingerbread men all cut out I started piecing them together.


First, I determined what side I wanted to use as the front of my gingerbread man.

Then, I added the eyes.


I like to use the safety eyes, but you could use buttons, or felt, or anything that you wanted to.

Next, I added the buttons.


I made mine, but again you could use whatever you would like.


After sewing on the buttons I cut some strips of fabric for the scarf.


I cut them extra long (just in case), and then just trimmed them up later.

Okay, so now that the front of the gingerbread man is done it's time to put him all together.


I put both scarf strips on top of each other, and then placed them where I wanted the scarf to go.

Next, I put the other piece of the gingerbread man on top of the first piece.


Then, I sewed around the edges making sure to catch the scarf, and to leave an opening to turn him right side out.


Once he was all sewn up I just turn him right side out...


And stuffed!


Next, I just stitch up the opening, cut his scarf to a length that I was happy with, and that was it!

TA-DA!


Again, aren't they CUTE! :o)

I just LOVE them!


I have to admit that they were pretty hard to give away, but you can guarantee that I will be whipping up a few more for my house. :o)


Happy Tuesday! 
Pin It!

Saturday, November 10, 2012

Happy Sappy Saturday!


For the past 8 months N8dogg and I have had an uneven number of nephews and nieces.

That was until yesterday...

Welcome to the family Wee Baby Olivia!

We LOVE you!


Happy Sappy Saturday! 
Pin It!

Wednesday, October 31, 2012

Monster Booties!

Hello, and Happy Halloween!

Are you ready for Halloween?

I think I am as ready as I am going to be. :o)

I didn't get my wreath done, but I did get all my Halloween goodies sent to the nieces and nephews.

Yay!

I love making goodie bags!

It gives me a perfect excuse to browse all of those fun Walmart and Target aisles. :o)

Anyway, while I was making these I came to the realization that when it comes to goodie bags the Wee Baby Caleb often gets jipped.

I felt bad about this because even though he might not remember that he got jipped...I will.

So, I decided that he needed something for Halloween too.

Now, this was one of those out of the blue kind of thoughts that just kind of materialized into...

Monster Booties!


Cute, huh!

They were pretty simple to make too.

I started with THIS free Bootie Pattern and Tutorial created by Dorothy of Come What May, and Loving It.

First, I cut out my pattern pieces.


Then, I used a piece of junk mail to cut some triangle toes, and taped them on to the Bootie Sole.


I turned the Bootie Sole upside down...


And lined up the Bootie Top with the Bootie Sole.


Then, I added some more triangle toes to the Bootie Top making sure they all lined up.


After adding all the toes your pattern pieces should look like this.


Now, just cut out your fabric, and follow Dorothy's Tutorial.


Quick Note: I didn't add a non-slip sole to my booties, but you could if you wanted to.

Anyway, it was actually a really quick sew, and I was so happy with how they turned out.


Now, I just hope the Wee Baby Caleb likes them :o)


Happy Wednesday, and Happy Halloween!  


Pin It!

Thursday, October 25, 2012

Monster Peep Hole!

Hello, and Happy Thursday!

Random question: do you remember when I Framed my Peep Hole?


Well, did you know that N8dogg had to install that peep hole himself, and that we are the only people on the block that have one?

Yep, it's true, and while I love having a peep hole I don't love that it has taken away my ability to have a front door wreath. :(

Now, as you may or may not know I am kind of obsessed with wreaths...

Random side note: I am just finishing a cute Halloween wreath that I hope to post about tomorrow.

Here's a sneak peek:


Yay!

Anyway, so my peep hole is hampering my wreath obsession, and friends it has not been good.

I keep seeing all these cute wreaths on my neighbor's doors, and it makes me sad.

So, I decided I needed to do something about it. :o)


TA-DA!

Monster Peep Hole!


Cute, huh!

Oh, and it was super easy to make.

I found the Monster image on PicMonkey, and just like my Peep Hole Frame I cut it out with my Silhouette CAMEO.


See, so easy, but so cute!

I think I may have found my new "go to" Holiday Decoration. :o)


Happy Thursday!  

Pin It!

Tuesday, October 23, 2012

A New Fall Scarf...In Plum!

Hello, and Happy Tuesday!

How was your weekend?

I worked, and it got a little crazy...

So, let's just say I am happy that it's over. :o)

Anyway, why I was at work this weekend I got out my crochet hook, and did a little scarf making.


I made this for my friend for her Birthday, and really like how it turned out.
 
Oooh, and I LOVE the color!

I think I might be slightly obsessed with the color PLUM. :o)


Anyway, like I said I really liked how it turned out.

It is super warm, and really comfortable, which will be perfect for both Fall and Winter.

If it still wasn't 80 degrees where I live I would wear mine (yes, I have several) every day.


OH, and it was really simple to make too.

Which is always a plus in my book. :o)


If I find a surplus of time (BAHAHA) I might even get around to making a tutorial, but we will see. :o)


Happy Tuesday! 


Pin It!

Sunday, October 21, 2012

Happy Sappy Saturday...on Sunday!

N8dogg and I on Google Latitude.
Don't mind the dude in between us...that's just my brother-in-law, Buffalo. :o) 

Yesterday, N8dogg stopped in and saw me on his way to Grantsville. 

He was passing through town at 2:00 AM, and just stopped long enough to have a shower and say Hi.

He was back on the road by 3:00 AM, and even though I was sad to see him go I was so happy to have seen him...even if it was for only 20 minutes. :o) 

I love you N8dogg! 


Happy Sappy Saturday...on Sunday! 


Pin It!

Wednesday, October 17, 2012

Halloween Distressed Subway Art!

Well, Hello!

I know, it's been FOREVER!

I am going to spare you the details of my "Oh, So Crazy Life", and just say that I am happy to be here today. :o)

Anyway, since it's getting closer to Halloween I thought I better start getting some of my Halloween projects done, and this was first on the list.

Halloween Distressed Subway Art!


Remember my Weekend Memories with Subway Art...

Where I used Delia's Distressed Canvas Tutorial to make some distressed Subway Art.

Well, after that I became slightly obsessed with making them, and decided that I need a Halloween version. :o)

I found this Super Cute Free Subway Art Printable over at That's What Che Said...

Gathered my supplies, and got to work.

I started with an 8x10 canvas...


And some Golden Regular Gel.


Since this stuff can be kind of tricky see Delia's Complete Tutorial before using it. :o)

Next, I printed off my Subway Art.


Make sure to print your image in reverse if you are going to be transferring it to anything. I have made that mistake one too many times.

Oh, and again read Delia's Tutorial all the way through for tips on printing your images because this will only work with images printed with Toner.

Ok, so once you have everything all together you can start transferring.

I started by painting an even layer of the Gel onto my canvas.

Then, once it was coated I took my printable and sprayed it with a little water.


Next, I put it face down onto my canvas, and smoothed out all the bubbles.


Now, it's time to wait.

I usually just let it dry overnight, and make sure it is completely dry before working on it the next day.


Once it is completely dry I spray some water over it, and start to slowly rub off the paper.


You will want to do this process two or three times depending on how much paper comes off each time.

This was after the second time...


And this was after the third.


Some of the image may come off in more areas than others depending on how evenly your Gel was painted on.


I liked mine really distressed, but if you don't just make sure your Gel is painted on REALLY evenly. :o)

Ok, so once most of your paper is rubbed off you just finish it with another coat of Gel or Mod Podge.


However, I went one step further, and gave it a coat of Glitter Glue. :o)


TA-DA!


I really liked how it turned out.


What do you think?

Happy Wednesday! 


Pin It!