Saturday, June 30, 2012

Happy Sappy Saturday!


Cute, huh! 

Want to know what made them even cuter? 

The $4.49 price tag!

Crazy, I know!

So, I bought 3 pairs...

:o) 

Happy Sappy Saturday! 


Pin It!

Friday, June 29, 2012

A Moment of Temporary Insanity that turned out to be Awesome...

Ok, so to explain the final highlight of this past weekend we have to start from the beginning.

I have long hair.

Like, to my waist long hair.

It is thick and wavy, and I love it.

Well, at least I thought I loved it...

For the past year I have pulled my hair up in a bun on the side of my head.

No matter how my hair started out each morning by the middle of the day it would end up in a bun on the side of my head.

Now, don't get me wrong I saw nothing wrong with my bun...until I started getting headaches.

Yep, for the past couple of weeks I have been getting headaches from my bun.

At first it wasn't that big of deal, and then one night while I was at work my head started hurting so bad that I basically had to ripe my bun out.


Yep, that would be 9, count'em, 9 elastics were holding up my one bun!

That was enough to realize that I was in desperate need of a hair cut.

However, over the next week or so I hummed and hawed about it, and the level of desperateness dissipated...until I tried to actually "do" my hair on Saturday.

I will spare you the details, and just tell you that after 2 hours of blow drying, curling, and combing I was still standing in front of the bathroom mirror.

There was hair everywhere, I was late, I was in tears, and I had no choice but to pull my hair into a bun.

It was horrible.

Then, on Sunday N8dogg said let's do it. Let's just cut it off...

And I agreed.

So, he grabbed a razor blade...


And 17" later...


I had a new do.


I call it a moment of temporary insanity...that turned out to be really Awesome.

What do you think?

Happy Freaking Friday!

Pin It!

Wednesday, June 27, 2012

Mr. and Mrs. Pillows...

So, moving on with more highlights from my weekend.

On Saturday N8dogg and I headed up to Cedar City for a Bridal Shower.

Remember on Monday when I asked if you all had a go to Wedding Gift?

Well, I think I may have finally found mine. :o)


Cute, huh!

Oh, and they were Super Simple to make.


I just bought some plain white pillow cases and pillows at Walmart.

Then, made some Mr. and Mrs. Freezer Paper Stencils.

Ironed them on, painted them with a little black fabric paint, and then waited for them to dry.

TA-DA!

A Super Simple, and Super Cute Wedding (or Bridal Shower) Gift.
 
What do you think?

Would you like to receive these as a gift? 

Happy Wednesday! 
Pin It!

Monday, June 25, 2012

Presents for another Wee Baby!

Hello, and Happy Monday!

How was your weekend?

Mine was most definitely Awesome!

There are a lot of highlights to go over, so we better start from the beginning. :o)

On Friday I sent some Happy Mail to another Wee Baby!

Yay!

Any guesses on what I sent?


Yep, you guessed it, A Faux Chenille Blanket.


It's crazy, after I finished my first Faux Chenille Blanket I swore I would never make another one again!


So, never in a million years did I ever think these would become my go to baby gift.


Of course, there is always room for improvement....ahem....such as the binding.

One day I will master corners...one day.

Anyway, I also made some personalized onesies using some Freezer Paper Stencils.


The "G" was my favorite. 


I just loved the Pearl Pink paint.

The Yellow Peace Sign was pretty cute too...


And the Love Birds just made my day. :o)


Anyway, once everything was finished I wrapped it up, and created a custom tag for it in PicMonkey (which I am really starting to LOVE).


Then, I did the same for some coloring books and crayons for the Wee Baby's Big Bros. :o)


So, what do you think?

Do you have a go to baby gift?

What about Wedding gifts?

....We'll get to that later. :o)

Happy Monday! 

Pin It!

Saturday, June 23, 2012

Happy Sappy Saturday!


Yep...That's a whole lot of Taffy...

But more on that later...

:o)

Happy Sappy Saturday! 


Pin It!

Friday, June 22, 2012

Winner! Winner!

So, a couple of weeks ago I entered a giveaway over at Uncommon, and guess what?

I WON!


Yay!

I probably enter 10 giveaways a week, and this is only the second time I have ever won so I was super excited.

This was my first WIN from over at Noodlehead, and since it was way before I really started blogging I have absolutely no documentation of it. :o(

However, I will tell you that bag is still well used , and very loved at my house. I hope to one day make another just like it. :o)

Anyway, back to my most recent WIN.

Here's what came in my kit:


  • Facial Cleanser
  • Instant Radiance Facial Scrub
  • Skin Renewal Clay Mask
  • Cellular Activator Face Serum
  • Restorative Eye Cream 
  • Moisture Therapy Regenerative Cream (Which is AMAZING!)  

Oh, and I almost forgot it also came with this super soft terry cloth headband. :o) 


Yay! 

I was so excited when I won this because I really needed to step-up my facial routine, and this has been the perfect upgrade! 

Thank you again Uncommon for the AWESOME Giveaway! 

Oh, and HAPPY FREAKING FRIDAY!


Pin It!

Tuesday, June 19, 2012

A Banded Tunic...For Me!

So, this Summer I really want to try and make some clothes for myself.

So far...I have a skirt...and now a tunic! :o) 

I started with 2 yards of blue knit fabric from fabric.com that I bought on clearance for about $2.00 a yard. 


I folded it into fourths, and then waited for my helper to leave. :o) 


After BB left, I took one of my shirts, folded in half, and laid it on the right hand corner of my fabric. 


Then, I cut around the outline of my shirt cutting all the way down to the end of the fabric. 


I removed my shirt, and then cut the neckline. 


In hindsight I wish I had cut the neckline a little smaller, because after it was hemmed it was a little wide. 

Anyway, after I got it cut out I hemmed the neckline and the sleeves, and then sewed up the sides. 


Then, I determined how long I wanted my tunic, and cut off the bottom band. 


Next, I measured the band around my waist, and cut off the excess. 


I took the bottom piece, sewed up the side, folded it over into a band, and pressed it down. 


Then, I sewed the band onto the tunic just like an elastic... 


And that's it! 

TA-DA! 


All in all I am pretty happy with how it turned out. 

It fits just like I wanted it to...except for the neckline...and if anything it's definitely comfy. :o) 

2 pieces of clothing down...hopefully more to come! 

Happy Tuesday! 


Pin It!

Monday, June 18, 2012

Ruffled Power Shot Camera Strap

Hello, and Happy Monday!

How was your weekend?

Mine was very productive, which made it Awesome! :o)

Want to see something that I have been working on?


It's my very own camera strap!

Yay!

Ok, let me explain. When it comes to cameras I use a little (pink) Canon Power Shot, and for the most part it works great.

However, when I am taking photos for my blog or at family events I tend to set my camera down...and then never pick it back up.

I have a wrist strap, but it's just not that awesome...


So, I decided that I needed a cute camera strap, like the ones you see for DSLR cameras, to hang around my neck.

However, I could never really find anything like that for Power Shot like cameras. I found a ton of cute camera straps and strap covers for DSLR cameras, but nothing for Point and Shoot cameras.

So, I decided to make my own, and share it with all of you!

Yay!

Oh, since I kind of had to make this up as I went along,  it's a little rough around the edges just so you know. :o)

I started by cutting a strip of fabric 8" wide  x 36" long.


Then, I cut another strip of fabric 8" wide x 36" long in a contrasting color.


Note: The strip of contrasting fabric doesn't need to be a 36" long, but because I wasn't really sure how much I needed or how long I wanted my strap to be I cut it long just to be safe. :o)

Next, I cut the strip of contrasting fabric in half so I had 2 strips of fabric that were 4" wide x 36" long.


Once everything was cut I took my 8" x 36" piece of fabric, and pressed it down the center with right sides facing. 


Then, I sewed up the raw edge, and turned it right side out.


Next, I pressed the strip with the seam down the center. 


Then, using the center seam as a guide, I used my sewing machine to ruffle the strip.


Not sure how to make a ruffle? Check out these Tutorials over at See Kate Sew. :o)

Once my ruffle was done I set it aside, and stared working with the strips of contrasting fabric.

Just like with the 8" x 36" strip:

I pressed right sides together.

Sewed up the raw edges.

Turned it right side out.


And then pressed the seam down the center. 


Next, it's time to pin! 

I pressed down my ruffle, and then pinned one of the contrasting strips down the center with the seams facing together. 


Then, I flipped everything over, and did the same thing to the other side. 


Before I started to sew I made sure that both sides matched up.

Then, I topped stitched down both sides unpinning as I went.


Once everything was sewn together I trimmed up the ends and set it aside.


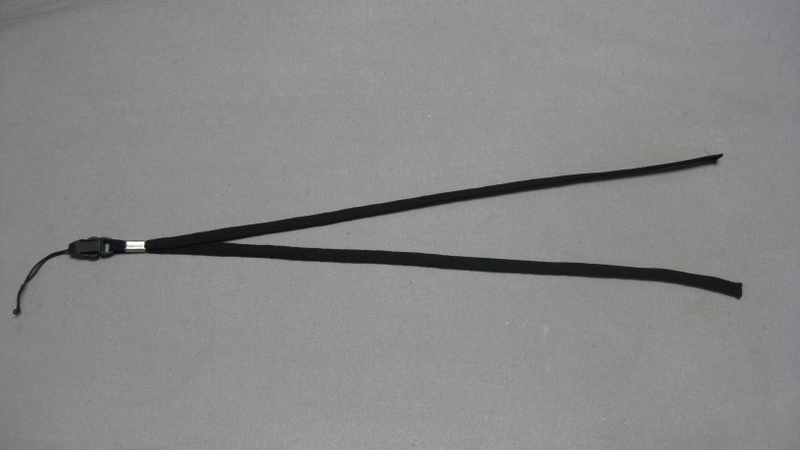
Then, I took my wrist strap, and cut it in half.


If your camera doesn't come with a wrist strap, no worries. Just use any camera/cell phone/ lanyard that fits your camera. I found These on Amazon for pretty cheap. 

Oh, and I like the ones with the little detachable hook. That way you can make several camera straps, and then just clip your camera into the one you want. :o) 

Anyway, next I placed the end of my wrist strap into the end of my camera strap. 

In hindsight I wish I would have trimmed the wrist strap down a bit. My finished strap is a little long, so the next one I make with most likely be a little shorter. 


Once the wrist strap was securely tucked in I folded down the edge of my camera strap, and pressed. 


Next, I folded it over one more time, and pressed again.


Then, I sewed horizontally across the folded area. (I actually sewed it twice for more strength). 


Finally, I repeated the last couple of steps on the other side, and that was it! 

TA-DA!


Now, just attach to your camera, and your all set!


Happy Monday! 


Pin It!